
Follow the procedure below to back up your SQL Azure hosted database to a SQL Server 2008 R2 database. Keep in mind that you will need some software that you may not already possess and that the new database cannot overwrite an existing one on SQL Server as you’d expect to do if you were restoring a DB by following the process outlined here.
1. You will need to download one of the Azure Storage explorers. It doesn’t really matter which one you will use (there’s a list of Microsoft suggested explorers that you can access from within the Azure Management Console). I’m using the Azure Storage Explorer, which you can get from Codeplex. It is necessary to download an explorer as you will need it to download the DB backup file in its original format.
2. You will need to download the SQL Server 2012 Management Studio. This is necessary as the 2008 R2 version does not allow you to “import a data-tier application” (which is what we need to do in order to restore an Azure db to SQL Server). Don’t worry, we will still be restoring to a SQL Server 2008 R2! We just need the 2012 Management Studio. You can download this from here. Note that after you click on download, you will be allowed to select which products you wish to install. Just check on the “ENU\x64\SQLManagementStudio_x64_ENU.exe” as it is the only thing you will be needing (unless you’re on a 32-bit architecture, in which case you’ll need to find the 32-bit version). Install the application.
3. After October 2013, you will also need to download the SQL Server Data Tools update, otherwise you will get an error message when you try to restore your DB. You can download the update here . Install the update
After you’ve made sure you have all the pre-requisites to perform the backup and restore of your database, you simply need to:
1. Log on to http://manage.windowsazure.com . You don’t need to go to the SQL Azure DB Management console. You can back up your database from the Azure Management console. Just click on the DB icon on the left hand side, select your DB in the listing of SQL databases and click on “Export” at the bottom action bar.
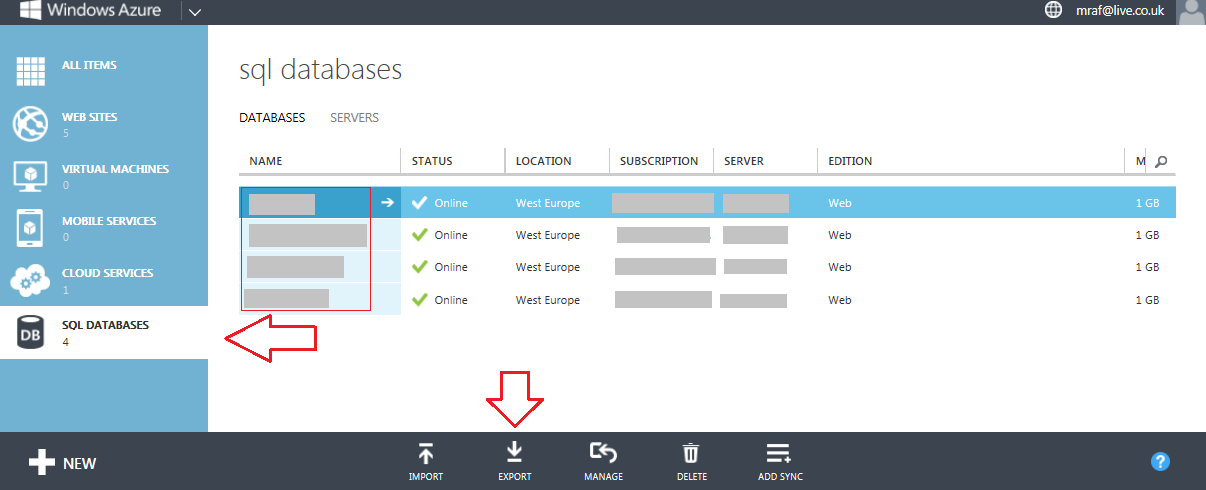
2. You will be presented with the EXPORT DATABASE pop-up. You will need to name your back-up file, select a Blob storage account (you will need to create one if you don’t already have access to one), you will need to select or create a container (it’s probably better to create one) and, last, you will need to enter your server credentials. Note that these are the administrator credentials from SQL Azure and not the ones you used to access your Windows Azure console (unless you’ve used the same credentials when creating the users). Click the tick on the lower hand corner to create the backup.
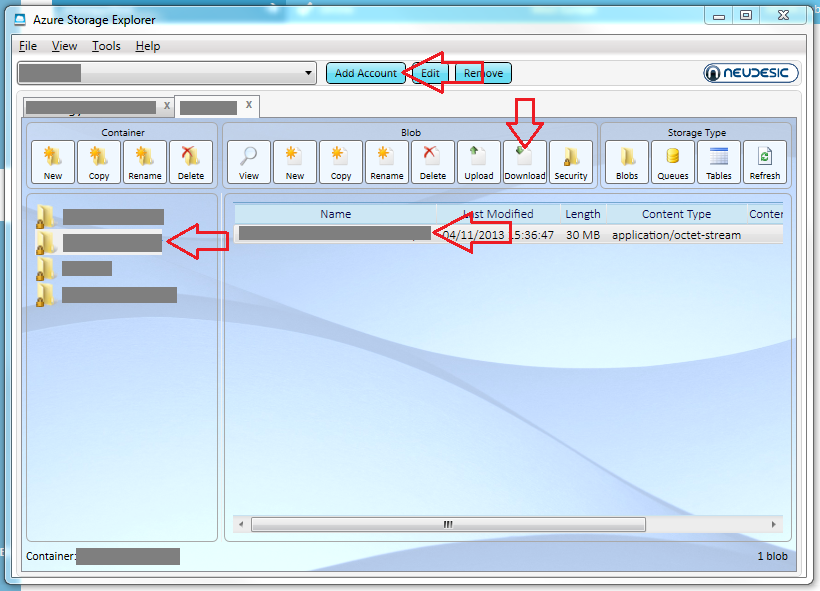
3. Once the back-up process is complete, you will need to download the .bacpac file to your local machine. You could click on the “Storage” icon on the left hand side and access the file from the Windows Azure console, but if you tried to download the file from the container by clicking the Download action on the bottom action bar, you would not get the .bacpac file. Instead, you’d get an uncompressed listing of the files that make up the .bacpac file. Hence, you’ll be using the Azure Storage Explorer. Run the explorer (whichever you opted to download and use) and access your Azure Storage account (if you’re using the Azure Storage Explorer, you simply need to click on Add Account and then fill in the name of your Storage Account as it is set up in Windows Azure and a Storage Account Key -you can find your key by simply clicking on the Storage icon in Windows Azure and then selecting MANAGE ACCESS KEYS in the bottom action bar). Depending on the contents of the storage account, it may take a few minutes for the explorer to populate the view. Once it’s done, you will need to click on the container you used to save your .bacpac file, then select the file in the main window and click on the download icon.
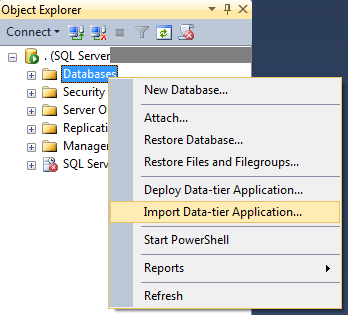
4. Once you’ve downloaded the .bacpac file, you’re ready to restore to your SQL Server 2008 R2. Start the SQL Server 2012 Management Studio (make sure to start the 2012 version as you will now have both 2008 and 2012 version installed on your machine). Connect to your SQL Server 2008 R2 server and right click on “Databases” in the object explorer. Select “Import data-tier application” from the context menu.
5. You will need to select your .bacpac file in the “import from local disk” field. You will notice that there is the option to restore directly from the cloud. It’s better to avoid this option as, depending on the size of the DB and the connection speed, the process may time out before it has been completed. Click on next.
6. If you receive an error message about the 2.5 version of the schema file, go back and download and install the update for Visual Studio that was mentioned in the pre-requisites at the beginning of this post.
7. In the next screen, you will need to give a name to the Database you’re creating. Note that you cannot use a name that already exists. You used to be able to restore a database over an existing one and overwriting its contents. This is not the case now as a data-tier application will need to be restored as a new database in your SQL Server 2008 R2. Also, you will need to define where you want your database and log files to be created. Click next, review your settings and click on finish.
8. The application will start a list of operations after you click on finish. Hopefully, when they all complete, you will have a long list of green checks for “Success”. I’ve done this a few times and I had never had any issues so far. Any failures in the list will mean that you need to do some investigation to resolve it. If all’s gone well, you’re done. You should now be able to close your 2012 Management Console, connect to your SQL on SQL 2008 R2 and see the new database in your list of databases.
Sources:
1. Restore SQL Azure bacpac to MS SQL Server
2. Error restoring SQL Azure DB to SQL Server 2012