
Long intro
You know those older people whose favourite expression seems to always be “things were so much better before”? Yeah, I seem to become one of them. In any case, I prefer PST files, I prefer the simplicity in setting up Outlook and moving files and backups around, etc.
While setting up my O365 account however, Microsoft *strongly* suggests that we leave pst files to the past and start working with ost files. When security concerns come into play, I just STFU and listen. For more information (on how to force O365 to work with .pst files too, if you’re more stubborn than myself), navigate to Microsoft Docs’ specific section at: “POP3 and IMAP4 in Exchange Online“.
However, if you’re jumping on the wagon but still want to keep your Outlook files saved together, you will find that Outlook does not make it easy to move your ost file wherever your pst files are saved. You see, when you’re adding a new email account to Outlook, Outlook will allow you to create your pst file wherever you wish, or it will allow you to select an existing pst file. Both of these make it easy to keep all your pst files wherever you want; together or not, whichever you fancy. Outlook will also allow you to move your pst files without too much fuss.
None of the above is true with ost files. Outlook, by default, will create your ost file to your user directory. True, if you had kept all your pst files in your user directory, chances are you don’t mind. However, if your workflow differs, you can use the following straigh-forward steps to create your ost file wherever you wish.
Downsides
- You need to either do this the first time you add your account to Outlook, or you’ll need to remove your account and recreate it.
- Doing this means that ALL new OST files will from now on be saved in this new folder.
This is not a true “move”, it’s more of a “recreate in your location of preference”. If you’re OK with this, follow the steps below.
Steps
- Start the Registry Editor [start menu: type regedit: run the application]
- Expand the tree on the left to reach the folder “Outlook” in Software\Microsoft\Office\Version. [or, for Office 2016, type in the location field at the top: Computer\HKEY_CURRENT_USER\Software\Microsoft\Office\16.0\Outlook]
- On the right hand side, right click and create a new string value
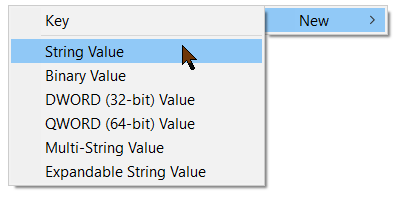
- Configure the new value with the required value and your location of choice [value name: ForceOSTPath, data: the full path where the OST will be saved – you don’t need to use quotes, even if there are spaces in it]

- Once you have completed the above, you can go ahead and start Outlook again to add the new account. All new OST files will now be created in the folder you selected.
Other options
If you have already been using your account for some time, you may not be able to (or may not want to) remove and re-add your account to Outlook. In that case, you may be interested in a different approach that makes use of what is called “Symbolic Links”. Look below in “references” if that is the way you want to go.