For power users that mostly work with the web interface, or the SPD10, this post will not prove very helpful. For those however who make the transition to programming with the Visual Studio 2010, being able to create new GUIDs will prove invaluable.
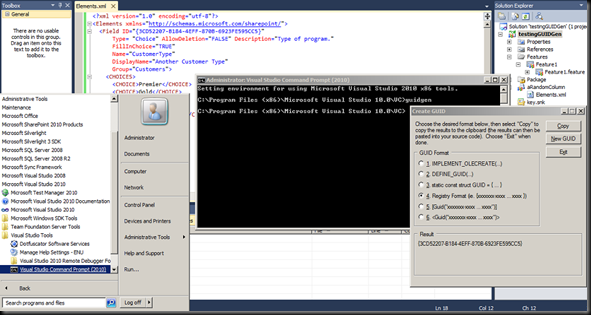
In order to create a new guid, you will need to use an application called “GUID Generator”, which ships with the Visual Studio. In order to start the application, you will need to:
1. Click on start and navigate to the Microsoft Visual Studio 2010 folder.
2. Open the Visual Studio Tools folder
3. Execute the Visual Studio Command Prompt (2010) application.
4. In the command prompt, type in “guidgen” (without the quotes, obviously) and hit on Enter.
5. You will be presented with a windows application. the window will read “Create GUID”.
6. GUIDs in SharePoint use the registry format so, make sure you have selected that option (option 4), and click on New GUID. You will see the freshly created GUID in the bottom section of the window (named “Result”). In order to use this GUID, click on Copy. This will copy the GUID to the clipboard so you can paste it in your application.

It is important to always make sure that you provide your application with fresh, unused GUIDs. Although applications with elements sharing the same GUID will mostly work in SharePoint, you have to understand that doing so, may lead you in predicaments that will be hard to identify and solve.
If, in any case, you do run in such a predicament, you may use Sean McDonough’s application in order to identify the applications that share the same GUID. For more information on how to do that, head over to the sharepointinterface.


[…] by the VS2010. b. you will need to provide your own GUID. If you don’t know how to do that, click here. c. the Name that you provide for the field is for programmatic use. The DisplayName is what will […]